
If your car is in need of repair because it won’t start or runs rough, you begin by identifying the primary cause of the problem. If your lawn is in need of repair, we take a similar approach.
Car: Is it out of fuel? Solution: Add fuel.

Lawn: Not green, nutrient starved? Solution: Add fertilizer
Car: Dead battery? Solution: Recharge or replace.
Lawn: Dead grass? Solution: Recharge, re-seed or add sod.
Car: Running rough, misfires? Solution: Replace the spark plugs.
Lawn: More weeds than grass? Solution: Kill the weeds, replace and / or repair the grass.
You get the idea. In order to repair your lawn, you need to identify the primary reason(s) that’s causing the problem.
Lawn repair can address several different issues. You might have:
1) More weeds than grass
2) Too many bare and brown spots in the lawn
3) Thin grass
4) Poor results from chemical fertilizers
When you search lawn repair near me it doesn’t always mean that you have to use a lawn care service or landscape contractor to do the job. Any and all of these issues are do-it-yourself (DYI) addressable. You just need to know where to start and how to proceed.
The proper starting point for repairing your lawn is to identify the underlying causes, like excessive presence of weeds. (The “Why”) Then identify the kind of weeds present in your yard. (The “What”) Finally, find the best “How” and “When” to repair your lawn.
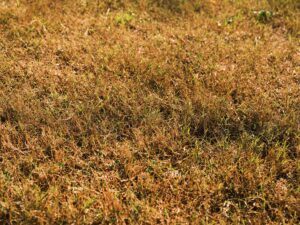
“The Why” – Reasons Your Lawn Thin and Full of Weeds
The way to address the “why” is actually fairly straight-forward. There are really only 3 reasons “why” you have so many weeds and your grass is looking thin or patchy. When you address the “why” you will also be taking big-steps toward preventing the problem from reoccurring in the future.

Little to no grass growth
Weeds thrive amongst thin, weak grass. The best way to keep weeds out is to have a thick, tall, dense lawn. Cutting your grass too short makes it more susceptible to a full-blown weed invasion. Plus, the extra shade provided by long blades of grass helps prevent sunlight from reaching weeds and crabgrass. Without light, the unwanted weeds can’t germinate, and you won’t have to put up with them taking root in your beautiful lawn. Set your lawn mower to a blade setting of 2.5 to 3 inches and you can quickly and easily check this cause off your to-do list.
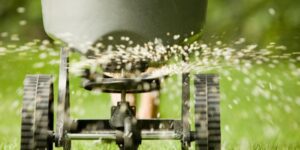
Your lawn will also require a regular diet of fertilizer, 3-4 times a season. Failure to fertilize regularly will always lead to little or no grass growth. Granular fertilizer products are often chemically formulated for the time of year they are to be applied. While nitrogen content will remain fairly consistent throughout the seasonal applications:
- early Spring fertilizers usually add a chemical to prevent (pre-emergent) weeds like crabgrass
- late Spring applications contain a product that targets actively growing weeds (post-emergent)
- Summer applications are all about greening up the grass and strengthening its resistance to heat and drought
- Fall fertilizer products kick up the potassium content which encourages a healthier lawn that is more winter hardy

Note: Your grass clippings contain 58% of the nitrogen added from fertilizers, improve soil conditions, suppress disease, and help reduce thatch and crabgrass. So, mow as often as needed to remove no more than 1/3 of the blade height of your grass. Then leave the clippings on your lawn. You can use a mulching mower and leave the Fall leaves too.
Thatch, the layer of dead grass that accumulates on your lawn can build up to a thick layer. Too much thatch robs your grass of necessary rain and nutrients which can be detrimental to your lawn if left untreated. Healthy lawns have less than ½ inch of thatch at dirt level. Thatch will prevent both water and fertilizer nutrients from reaching the grass root system resulting in little or no grass growth. This is often the reason why you see such poor performance from your fertilizer. It simply can’t get down to the grass at root level. So don’t blame the fertilizer you’re using – blame the thatch! A yard with excess thatch will be thin, weedy and dotted with brown patches in spite of your best fertilization efforts.
 Too little water
Weeds have spreading, aggressive root systems that will work overtime to steal moisture from your grass. If you are not watering your grass enough the weeds absorb what precious water there is, leaving your grass dry, thin, brown and thirsty. How much is enough? Watering deeply (1 inch) and less frequently forces roots to grow deep and reach as much water as possible. Avoid shallow watering (less than ½ inch) because it causes roots to spread out just beneath the soil and results in weaker turf.
Compacted soil
Healthy lawn soil is filled with small voids between the dirt particles. These voids help the soil retain water, oxygen and nutrients. These void spaces also make it easy for the grass roots to have ready access to these three key elements. A healthy lawn’s soil is about 50% solids and 50% air pockets.
But over time, lawns can get “pushed down” and become compacted. Foot traffic, summer outdoor activities, lawn maintenance equipment and even harsh weather contributes to compaction. When that happens, your soil becomes too dense and results in compacted soil.
When your soil becomes too compacted, your grassroots won’t have access to the nutrients, water, or air they need. This greatly stresses your lawn and makes for a perfect weed breeding ground.
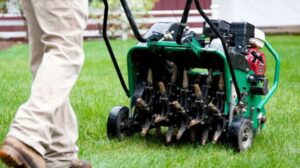
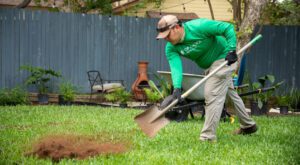
The easiest and most effective way to prevent your lawn soil from becoming compacted is to regularly core aerate your lawn. Core aeration is a mechanical process which extracts cores of soil, thatch and grass from the surface of the lawn to increase nutrient availability, water penetration, soil / air exchange and reduced compaction. Adding pelletized gypsum right after you aerate can assist with reducing soil compaction even deeper into the soil.
Too little water, grass mowed too short, excessive weed growth, soil compaction and thatch can also manifest as bare spots in an otherwise healthy lawn. Like we said earlier, identify these and possibly any additional primary causes of your bare spots too before taking action. If weeds are not the main problem in your lawn, be sure to look into the possibility of lawn pests like grubs.
Grubs can not only damage your turf, but they can disrupt the underlying soil layer. Grubs also attract wildlife that dig up your lawn looking to grab a quick meal of these pests. Moles, voles and the like tunnel underneath your grass which can lead to strips of heaved or depressed strips of uneven lawn. Grass rust can also result in thin, unhealthy grass. This fungus however can be easily treated with a liquid or granular product.

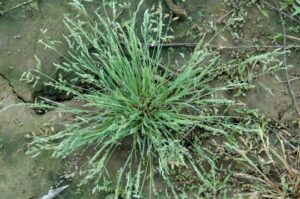
“The What” – TYPES OF Weeds IN YOUR LAWN
Even the best weed treatment product only targets specific weeds. What might work well on broadleaf weeds such as dandelions may perform poorly or not at all on grass-like weeds such as nutsedge. If you’re not sure, what type of weeds you have, here are a few weed types and their descriptions:
Broadleaf Weeds

Appearance: Broad, flat leaves
Common types: Bindweed, Buck horn, Clover, Ground ivy, Dandelions, thistle
Grass-like Weeds
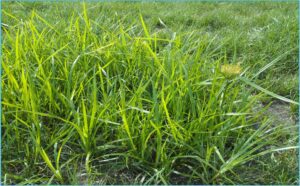
Appearance: Similar to grass, with hollow leaves in a triangular or tube shape
Common types: Nutsedge, Crabgrass, wild garlic, wild onion
Grassy Weeds
Appearance: Resembles grass, grows one leaf at a time
Common types: Foxtail, annual bluegrass, quackgrass,
Weeds can also be classified based on their life cycle—annual, biennial, or perennial.
- Annual: Produces seeds during one season only
- Biennial: Produces seeds during two back-to-back seasons
- Perennial: Produces seeds over many seasons
So if you can identify the type(s) of weed present in your lawn, then purchase and use a weed-killer that targets and kills the specific weed(s) terrorizing your lawn.
There are several methods to can use to kill weeds in your lawn:
- Spot treat – you simply spray your liquid herbicide directly onto each weed. Be sure to choose one that kills weeds and not weeds and grass!

![]()
- Pull them up and out – there are dozens of weed pulling tools on the market that make pulling weeds root and all, up and out of the lawn
- Granular weed treatments – these granular products can be “pre-emergent” (before they start to grow) or “post-emergent” (after they’ve grown). Granular weed killers should be applied when grass is damp and should not be watered for 48 hours after application. The dampness of the grass ensures the granular weed killer will “stick” to the leaf. Water applied too soon after application can wash off the weed killer before it can be absorbed. Don’t mow the grass before applying weed killers.Plan to leave your grass uncut for five days before application and two days after.
- Blanket liquid treatment – for most homeowners, this method is the fastest and easiest as it applies the liquid herbicide directly onto the entire lawn through a hose-end sprayer. Again, be sure to choose one that kills weeds and not weeds and grass!
- The “Nuclear Option” – for a lawn that’s beyond saving, applying herbicide that kills both weeds and grass is the final option.
When you do apply your weed killer, it’s crucial that you follow the directions to the letter. Make sure you apply the right product at the right time. It’s a good idea to check the weather forecast beforehand. You don’t want any storms to wash away your herbicide. Then you need to be patient. It may take several weeks for the herbicide to complete its job. And, if you’re planning on re-seeding your lawn, check the product label for the appropriate wait-time.
For some great additional tips and insight on killing weeds, check out the videos from our friend George from Princess Cut Lawncare: https://www.youtube.com/c/PrincessCutLawnCare
Once the herbicide has done its job and the weeds (and grass, if applicable) in the lawn has died and turned brown, it’s time for clean-up. You may need to use a hand weed pulling tool to remove any remaining hold-out weeds, but a power rake for de-thatching makes cleaning up any dead grass fairly easy.
If you’re planning on re-seeding or over-seeding, you must address the soil compaction issue. (Remember, that’s a big reason why you had the weeds in the first place.) We’ve not seen many if any positive results of sowing grass seed onto hard, un-worked soil. Rototilling your lawn is definitely not the best option (certainly not the easiest) as it creates a huge leveling issue. Better options are core aeration and or dethatching – or both.
The “How” and “When” – Fix and repair your lawn with our Lawn Repair Mix

With the for-mentioned issues addressed, it’s time for lawn repair. Here at Tim Wallace Supply we recommend an application of our Lawn Repair Mix (The “How”) in early Fall (The “When”) – between late August and mid-September as a powerful, safe and effective natural alternative to fall season chemical fertilizers. This natural soil amendment blends the 3 top beneficial products your lawn needs most – and in the optimal percentages: 50% topsoil, 25% fine sand and 25 % Purple Cow Classic compost. (Purple Cow Classic Compost is 100% plant based finely screened, manure, weed seed and pathogen free.) It can be used as an effective topdressing for overseeding or as a stand-alone topdressing mix (think natural fertilizer). Either way it’s used you will see lawn improvement.
The actual application of the Lawn Repair Mix can be done several different ways. A mechanical topdressing machine makes the job quick and easy. Finding a topdressing machine at a rental outlet that delivers might be difficult as the machine is too large for anything but a truck or trailer with a loading ramp. However, there are several other DYI – friendly options:
Option One:
- Load you wheelbarrow from the pile of delivered material
- Dump small to medium sized mounds of material strategically around the yard
- Use a tine, leaf, landscape rake, lawn leveling rake or even a push broom to spread the topdressing to your desired ½” depth. (After you create your first few mounds, spread out the material so you get a better idea of how big and how far apart the piles will need to be.)
Option Two:
- Load you wheelbarrow from the pile of delivered material
- Using your shovel, throw / broadcast the topdressing onto the lawn. Visually, it will appear that you’re making the lawn look “dirty”. What you’re trying to achieve is that consistent ½” layer of material over the entire lawn.
Not every lawn will require over-seeding. Our Lawn Repair Mix will improve an existing lawn thanks to its 3 quality components. Just remember to spread the mix to a depth of ½” or so -you want to be able to see he tops of your existing grass. The ½” depth will ensure that you do not smother and choke out the grass you currently have.
 Certainly, adding fresh grass seed to the lawn at the same time you apply the Lawn Repair Mix can fill-in and thicken your lawn. (Be certain to use a good quality grass seed that’s blended specifically for the amount of sunlight that’s present.) You can add the Lawn Repair Mix and then over-seed, but that requires the seed to be raked into the new layer of soil. Our preferred approach is to over-seed right after core aeration or de-thatching and then add your Lawn Repair Mix on top. This way the seed is covered and in contact with soil top and bottom which is critical for seed germination. But, don’t lay down grass seed unless you’re going to top-dress and begin watering immediately after. Your seed may die prematurely if you do. And, with our Lawn Repair Mix, there’s no need to add a starter fertilizer to your lawn.
If you’ve not over-seeded, water regularly to insure that the Lawn Repair Mix is adsorbed into both the grass and roots. This equates to about one to 1.5 inches of water per week which is necessary to maintain a nice green color and active growth.
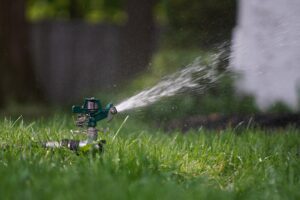
If you have over-seeded your lawn, water very lightly but frequently until the seed germinates. Usually, this means wetting down the seed once or twice a day. Do not let the seed dry out. After about two weeks, water deeply (about 1”) once a week to encourage strong, deep rooting. Some grasses like the fine fescue and rye will sprout in 5-7 days. Bluegrass seeds take longer – 10 to 14 days, so be patient and diligent.
Prime overseeding and lawn repair and renovation time is late August until mid-September. Your grass will require enough time after germinating to mature and thicken up before the cold weather sets in. You’re aiming for the grass to grow tall enough to require at least two mows before the end of the normal growing season. Pull by hand any weeds that are sure to pop up. Don’t apply any herbicides or Fall lawn food until lawn has been mowed 2-3 times.
When your yard is in need of lawn repair and renovation, go with the Tim Wallace Supply’s Lawn Repair Mix. The rule of thumb we use for quantity calculating is 1.5 cubic yards per every 1,000 square feet. So, a 5,000 square foot yard would need about 7.5 cubic yards of Lawn Repair Mix. Call today or stop in to talk with one of our knowledgeable staff and to schedule your home delivery. (630) 759-1080.